
If you have gotten to this point in your install, this means that you have read and are familiar with our General Instructions page. If that is correct, please continue on here:
! ! ! BEFORE YOU TURN THE KEY ON FOR THE FIRST TIME ! ! !
Step 1. Verify both gauges read 0 (vacuum will read a negative at high elevation). This should be done BEFORE you install them, but I am reiterating this now. Reminder, once these gauges are installed – we can not warranty them.
Step 2. Pre-fill the water fuel separator and post pump filter. Install them as tight as you can by HAND.
Step 2a. Make sure the drain is tight on the water separator.
Step 3. Make sure the vacuum gauge is installed before the water separator.
Step 4. Submerse your green and blue quick disconnect fittings into a bucket of diesel. Make sure the green quick disconnect hose is not going “up-hill” for this test. The green quick disconnect should be submersed at all times during this test.
Step 5. Follow the blue quick disconnect line all the way up to the bottom of the regulator. Fix this line routing if it is wrong.
Step 6. Follow the line that goes forward out of the fuel pump all the way up to the fuel pump replacement fitting. Fix this line routing if it is wrong. It should have a paper tag on it. You can remove this tag after 200 miles.
Step 7. Set your regulator adjusting screw to where 7 threads are protruding above the jam nut. You only need to tighten the jam nut by hand right now.
Step 8. VERIFY your black wire is black from the pump forward and on the ground sign (-). Cycle the key on, DO NOT START THE TRUCK. At first the pump may be noisy but should quickly quiet down. Click HERE for a video about step 8-11.
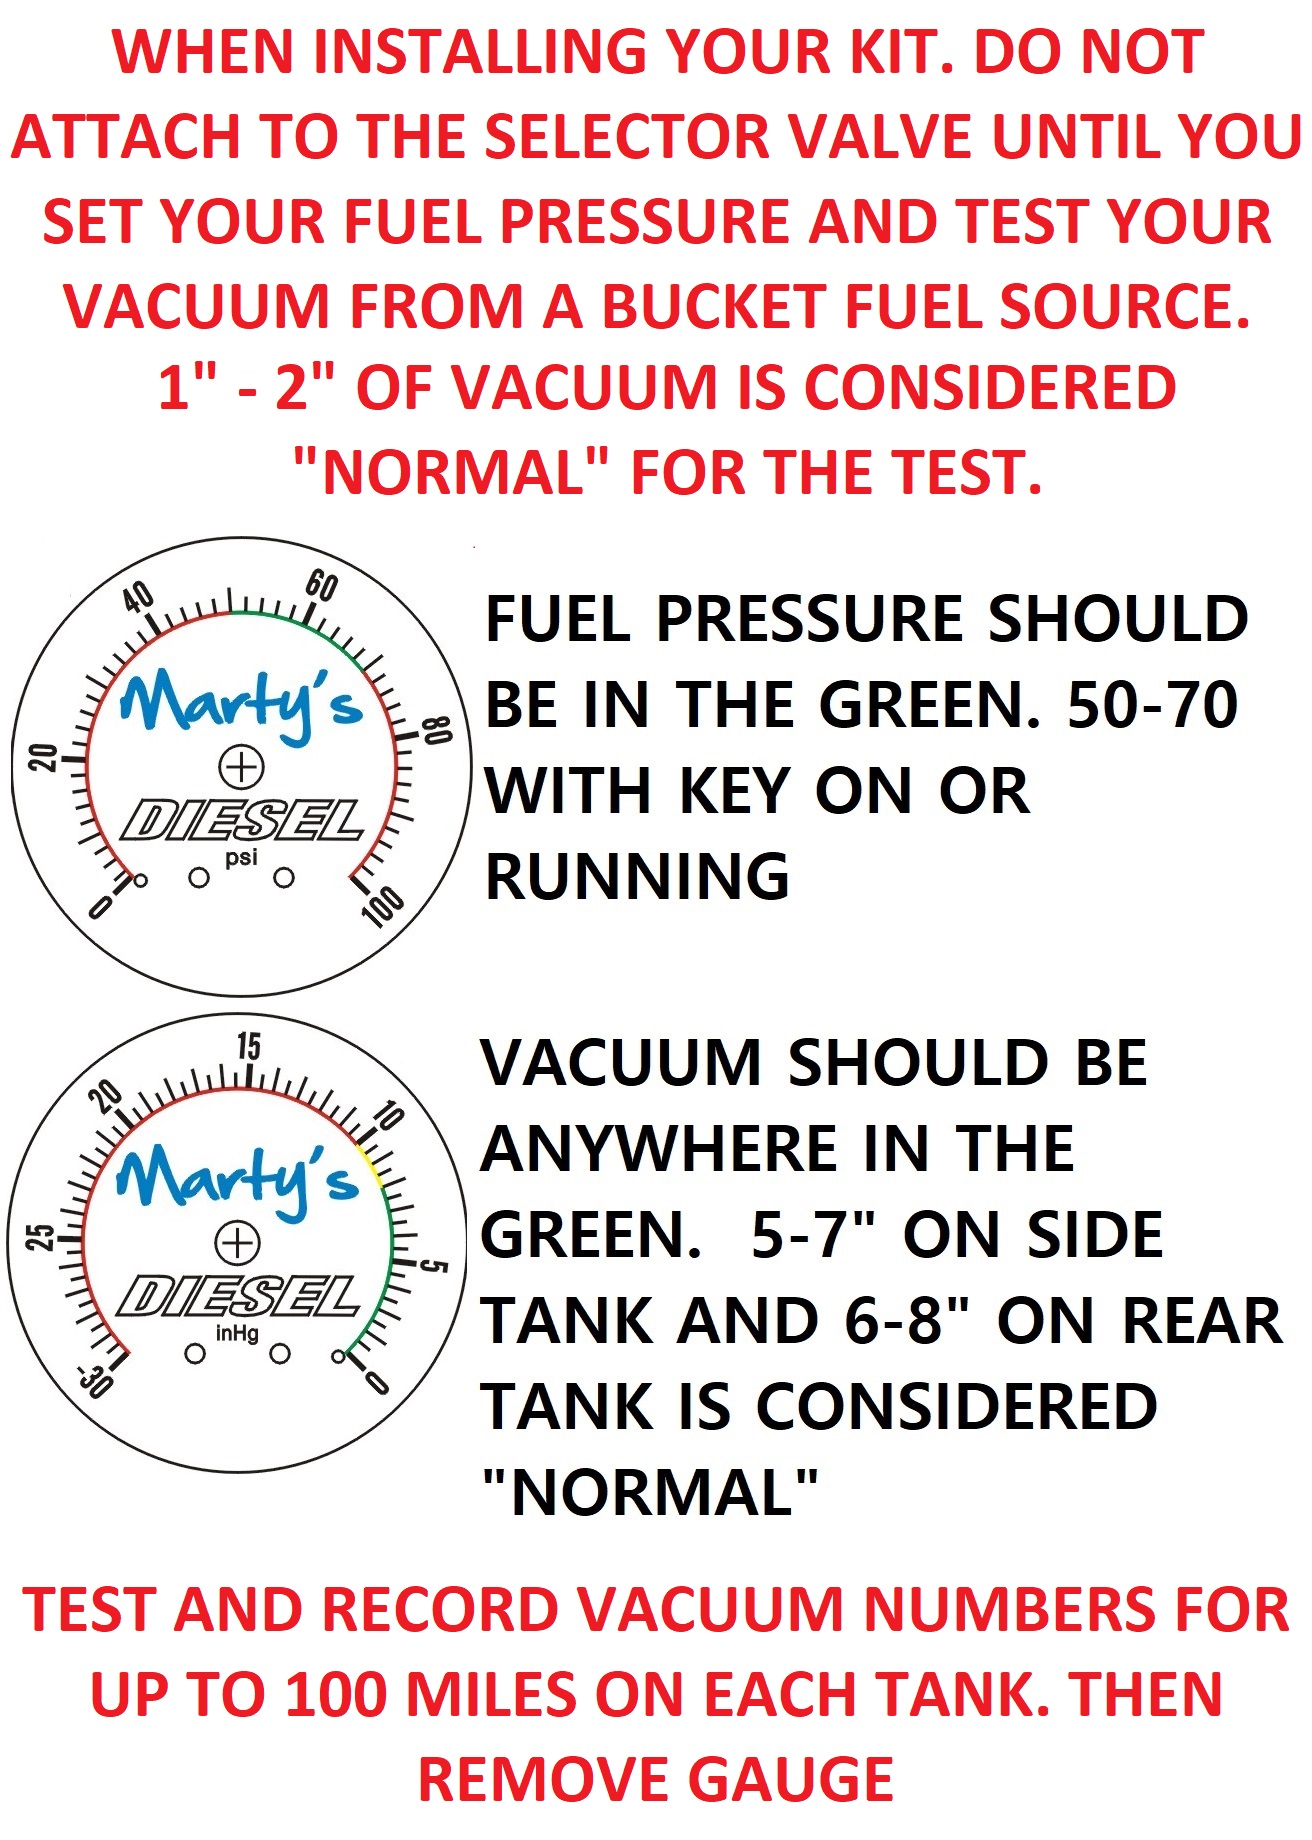
Step 9. Check for leaks then adjust fuel pressure at the regulator to 60 psi. Click HERE for a video about adjusting your fuel pressure.
Step 10. Observe the vacuum gauge, it should read 0-2 inHG on the gauge (unless you are at a high elevation).
Step 11. Observe the fuel coming out of the blue quick disconnect. It should not have a LOT of aeration. Depending on your voltage – you should be passing anywhere from a ½ gallon to 1 gallon of fuel per minute through this line.
Step 12. Look over the entire system while allowing the pump to run. Check for leaks, installation errors etc. Fix any errors BEFORE hooking the green and blue quick disconnects up to the selector valve. By connecting these quick disconnects you are acknowledging that the fuel system is 100% error free and you are ready to test the rear portion of the fuel system you did not modify with our kit.
Step 13. Turn your key off. Connect your green and blue quick disconnects to the selector valve.
Step 14. Choose the front tank on your dash. Cycle your key on. Your vacuum should read 5-7 inHG, (unless you are at a high elevation). If your vacuum goes higher, do NOT use that tank – you MUST address that PROBLEM, before it damages your new fuel system.
Step 15. Choose the rear tank on your dash. Your tanks should switch. Your vacuum should read 6-8 inHG, (unless you are at a high elevation). If your vacuum goes higher, do NOT use that tank – you MUST address that PROBLEM, before it damages your new fuel system.
Step 16. If one of both of your tanks are operational – go ahead and start your truck. By starting your truck at this junction you are acknowledging that you have performed all of the above steps properly and are ready to move on. Monitor the vacuum on the tank(s) you are using for the next 100 miles per tank. If you never see the vacuum numbers exceed the specifications – remove the gauge and save for future diagnostics. It is suggested to periodically re-install this gauge to monitor your aging factory tank conditions. You should also reinstall the vacuum gauge if something changes with your truck or fuel system.
Step 16a. If neither of your tanks pass the vacuum test:
1. Consider replacing the problem tank(s). You can install a 38 gallon F26E Bronco tank in the rear if you want.
2. Purchase our pre-pump solutions kit if keeping both tanks.
3. Purchase one of our single tank conversion kits.
Step 17. If you skip ANY of these steps, you will LIKELY experience fuel system issues. We can not warranty items that fail due to installation errors.
Reminder – many other companies require a single tank conversion to convert to electric fuel. Here at Marty’s Diesel we believe with the use of the vacuum gauge that our customers can make that decision for themselves. However, if you choose to ignore the directions – you will very likely encounter a fuel pump failure in very little time. Often times OEM mechanical fuel pumps are replaced because they “stop working” and are replaced by an electric fuel kit. Regardless of brand you use – if you have a pre pump concern, it’s going to kill the pump whether it is an OEM mechanical, Walbro or OEM Super Duty Bosch 69136 pump. We can not stress this enough – we want you to address your actual problem and not the symptom so we supply you with a vacuum gauge to diagnose your concerns yourself.